Introducción a IPython Notebook
IPython Notebook
Hasta ahora hemos trabajado con Python ya sea directamente con la consola interactiva, o escribiendo scripts de Python usando un editor de texto.
Sin embargo, hay otras formas de trabajar con Python IPython es un conjunto de herramientas originalmente desarrolladas para hacer más fácil a los científicos el trabajar con Python y con datos. IPython te permite combinar exploración interactiva de Python con programas pre-escritos e incluso texto y ecuaciones para la documentación.
IPython no es un lenguage de programación diferente, es sólo un conjunto de programas de computadora creado para trabajar con Python, el lenguage de programación.
#
## Vistazo rápido de IPython
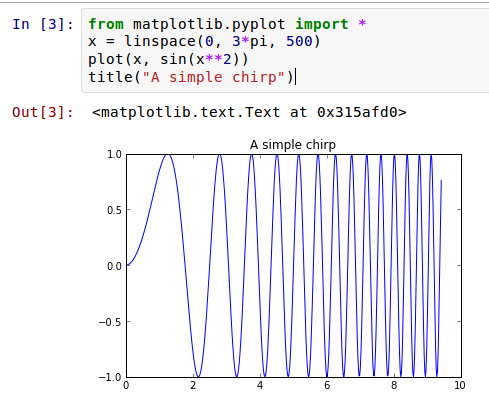
(Este es solo un ejemplo de lo que pueden hacer los iPython Notebooks, no te
sientas en la necesidad de enterderlo ahora mismo! Si después deseas
escribirlo en tu IPython Notebook, escribe el comando especial
%matplotlib inline antes de que empezar - hay una explicación más adelante
en el capítulo ‘Gráficas’.)
Instalando IPython Notebook
Hay varias formas de instalar IPython Notebook.
Si estás usando OS X o Windows, te recomendamos descargar e instalar Anaconda, el cuál es un instalador todo-embebido: Python junto con muchas otras herramientas útiles (incluído IPython Notebook.)
Anaconda es una descarga bastante pesada (alrededor de 300Mb), así que si estás en alguno de nuestros workshops tendremos algunos llaveros USB con los instaladores para ahorrar ancho de banda
Anaconda viene con su propia versión de Python 2.7, IPython Notebook, además de otras librerias como matplotlib y un administrador de paquetes (“conda”) que puedes usar para instalar otros paquetes u otras versiones de Python.
Si estás usando Linux, Anaconda está disponible como una opción, pero recomendamos intentar instalaar los programas usando tu distribución de Linux (mire en “Opciones alternativas”, a continuación).
Opciones alternativas
Esta sección es sólo si no quieres o no puedes usar Anaconda
Anaconda (descrito arriba) es la opción más sencilla para este workshop. Hay algunas otras opciones de instalación que puedes probar si deseas intentar algo diferente:
-
Si estás usando Linux, muchos administradores de paquetes incluyen IPython Notebook. Por ejemplo en Ubuntu o Debian:
sudo apt-get install ipython-notebook python-matplotlib -
Si tienes
pipinstalado (quizás desde algún otro workshop de OTS), entonces podrías se capaz de instalar IPython (más matplotlib) víapip, como a continuación:pip install ipython[notebook]
(Si estás usando OS X, quizás necesites Xcode para compilar dependencias.)
- Si no puedes tener funcionando IPYthon Notebook en tu computadora, existe un servicio llamado Wakari que puedes usar gratuitamente. En este caso tus programas no se estarán ejecutando en tu computadora, ellos los ejecutarán “en la nube” (por ejemplo, en algún servidor de Wakari) y sólo verás los resultados en tu navegador.
Notas relacionadas a Python 3
Anaconda y algunos otros instaladores vienen con Python versión 2. Podrías estasr usando Python versión 3 hasta ahora, ésta es la versión que el workshop ‘Introducción a la Programación’ te anima a usar.
El mundo Python está migrando lentamente hacia Python 3 para todo. IPython está disponible para ambos, versión 2 y 3, pero Anaconda viene con Python 2 ya que incluye algunos componentes que aún están disponible sólo para Python 2.
Python 2 y Python 3 tienen algunas incompatibilidades menores en la sintaxis del lenguage. Los programas mostrados en este workshop están designadas para funcionanr con ambos, pero si encuentras código que no funciona (pero quizás funcionan en la computadora del compañero de a lado) entonces quizás esa es la razón.
Starting IPython Notebook
You interact with IPython Notebook using your web browser. The Notebook program creates a “web server” locally on your computer that you then connect to.
On Windows, you can find a launcher for IPython Notebook under Anaconda in the Start menu.
On Linux or OS X, you can start IPython Notebook from the command line. First open a terminal window, use ‘cd’ to navigate to the directory where you want to store your Python files and notebook document files. Then run this command:
ipython notebook
You should see some output like this:
[NotebookApp] Using existing profile dir: u'/home/gus/.ipython/profile_default'
[NotebookApp] Serving notebooks from /home/gus/workshops
[NotebookApp] The IPython Notebook is running at: http://127.0.0.1:8888/
[NotebookApp] Use Control-C to stop this server and shut down all kernels.
A browser window may automatically open showing the IPython Notebook interface. If it doesn’t open, you can copy-paste the “http” address from the output and paste it into your browser.
Even though you’re interacting with IPython Notebook using your browser, Notebook is running right there on your computer in that window. Only you have access to it.
First Steps with Notebook
In your browser, click the “New Notebook” button and a new notebook will open up.
The empty box at the top is the first “cell” for entering Python code.
Try typing something like print("Hello World") into the cell. To run the code in the cell and see the output, click the Run button (play icon) on the toolbar, or type Shift-Enter:
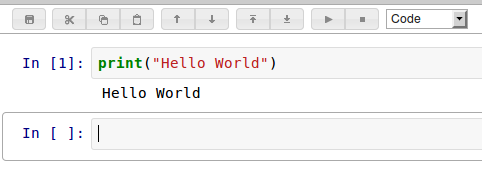
You’ll see that whenever you run a cell, a new empty cell appears where you can enter another set of Python statements. Try assigning a variable. Let’s make another shopping list:

When you Run this cell you won’t see any output, but behind the scenes the variable “shopping list” has been assigned.
We can see this by making a third cell to print the contents:
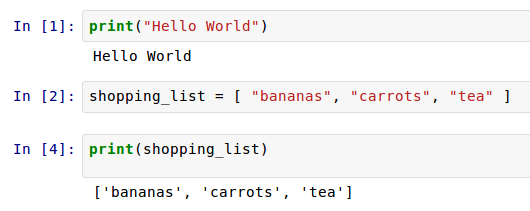
You can do anything with IPython Notebook cells that you’d do with normal Python code. As you build up the notebook full of cells you create a history of the things you’ve done and the results that were printed.
IPython Notebook Directory
When IPython Notebook starts up it prints a line like this:
[NotebookApp] Serving notebooks from /home/gus/workshops
This is the directory that it was started from, and it’s the working directory for loading Python files, text files, etc.
It can be helpful to make sure this directory is the directory where you plan to keep files related to your work.
On Windows with Anaconda this directory is called “IPython Notebooks” inside “My Documents”, and is created when you install Anaconda. On OS X, Linux or other Windows installations it’s up to you which directory you use.
If you’re launching from the command line, you can ‘cd’ to this directory before you launch Notebook.
If you’re using the command line on Windows, you can use Explorer to find your directory, then hold shift+right click. The context menu that comes up should have an option to “Start a command prompt here”.
Loading Notebook Files
You can also load IPython Notebooks that other people have created, saved as IPython Notebook files (File extension .ipynb.) Try downloading and opening this Notebook file with the shopping list example.
After you download the Notebook file, move it into your IPython Notebook working directory and then choose File -> Open in Notebook to open it.
That Notebook contains some additional code, and some suggestions for changes you can make by going back and editing the existing files. Take a few moments to play with the Notebook - rerun the cells, edit the cells to change them, don’t be afraid to break things!
Loading Python Files
You can also load a pre-existing Python file into an IPython Notebook cell by typing
%load "myprogram.py"
Into a cell and running it. This loads up a new cell containing the contents of myprogram.py.
Test this feature out by loading one of the scripts you wrote during the recap session. You may have to specify the full path to the script file, depending on the directory IPython Notebook started up from.
There is one other useful built-in tool for working with Python files:
%run "myprogram.py"
This will run myprogram.py and load the output into a Notebook cell.
Other IPython tips
-
As well as Shift-Enter there are other keyboard shortcuts in Notebook. Look under the Help menu -> Keyboard Shortcuts to see them all.
-
In previous workshops we used
help()to view help information in the Python interpreter. IPython Notebook makes this even simpler, you can just type the name of a Python function or module and end it with a?. Try it now, typerange?into a cell and run it. -
Using a nifty tool called NBViewer you can easily share IPython Notebooks on the internet, rendered as web pages (but still downloadable to play with in IPython.) Check out the NBViewer home page or the IPython Notebook gallery for some interesting ones.
Other Ways to Run IPython
Other options if you feel like exploring:
-
There is a command line “ipython” program (just run
ipythonwithout the –notebook argument) that behaves similarly to the “python” interactive shell, but with some of the nice features of IPython Notebook (although none of the graphical features.) -
There is a graphical IPython program (ie not web browser based) called “IPython QtConsole”. It’s like the command line IPython but with some graphical features. Launch this one by running
ipython qtconsole.
Doing the workshop without IPython
Tried out IPython Notebook but don’t really like it? No problem! The rest of the workshop can be completed without using IPython Notebook at all, feel free to go back to the Python coding tools you were using already.
Next Chapter
Time to give Notebook a real workout! The next chapter is Working With Text Files